Thursday, May 17, 2012

Get Rid of Those Ugly Brackets!

These are my bamboo roller shades on my porch. I think the hardware is ugly. I've been contemplating how to disguise them when all of a sudden an ideal solution landed in my lap!
These shades are in the process of going from natural to white. I experimented with brown first, but white is by far the better choice.
My neighbor had a long strip of moulding she was getting rid of and let me have it instead! It's 5" wide, which is perfect for what I need! So tonight I trimmed it to the length I need, will get it cleaned up, primed, and painted in the coming days, and will hang it from the soffit near the top of the bamboo shades with small "L" brackets. Pics to come!
This will work perfectly!

"You're Not Cool..."

That was my husband's reaction when he saw what I'd been up to while he was at work the other afternoon.

You see, my husband is afraid of what condition the wood floors are in UNDER the carpet and has expressed that he thinks we need to leave the carpets alone (I believe his exact words were, "I swear to God if you rip up the carpets that will be IT!"). On this particular day, however, I decided to dip my toes in the water (so to speak) and gauge how upset he'd be without carpet—I'm working up to ripping up the carpet in our living room and dining room areas (how bad can "IT" be??).
This is carpet on the upstairs landing outside of the bedrooms that I didn't take up when I removed the carpet from the stairs a couple of years ago.
Carpet's gone! Now on to the pad! Someone went berserk with the stapler!
And... VOILA! Look at that floor! Wood grain is so pretty!
Now I need to deal with the threshold in the door opening that goes from the bathroom to the landing. Currently we have linoleum in the bathroom and the bright metal toothed carpet/transition strip is no longer needed.
Look at those teeth!
After a quick trip to Lowe's we're all set! A nice oak transition strip between the bathroom and the landing!
The strip came in unfinished oak, but I had a can of spray stain/ lacquer that I hit it with to better blend in to the rest of the floor color for now.
Do you think it would make my husband feel any better to know that the carpet didn't leave without a fight? Those darn staples drew blood THREE TIMES! Grr...

Don't Tread on Me (the paint's not dry)!

The weather has been pleasant and it's time to get the porch opened up for the year! Let's get BUSY!

First I decided to put a finish coat of paint on the fireplace. I primed it last summer, but never got around to finish coating it. Can you tell which part is primed and which part has finish coat?
Top 1/4 of the fireplace is finish coated.
Next, on to the floor! Despite a thorough cleaning, a dingy grey floor remains. I want something that will look better suited to my furniture and decor. Red? Brown?
Here the floor is in the process of being primed.
Initially I was leaning towards the same shade of red as the pillows I made for the porch last summer. A quick mock-up in PhotoShop proved that that was the wrong decision! I decided to go with a sand color that echoed the color of my porch's rug.
I'm too lazy to remove all of this stuff from the porch to paint. Instead I painted a third, waited for it to dry, and moved things around. Took me longer to do it this way, but I don't care.
And here's a sneak peak of what it looks like together! More pics to come once I get everything situated...
Need to dig those pillows out of the basement!

Too Cute Not to Share!

Somebody found my boots...

An EGGS-travagant Wreath!

Here's a project my kid and I did that I've been meaning to share with you—a wreath in time for Easter!

First we cut two rings out of a large sheet of cardboard (as I recall, the outer edge is about 13"—I took my large cookie mixing bowl and traced around it). Then we hot-glued the rings together for extra rigidity. After that we hot-glued two rows of brightly colored plastic Easter eggs onto the ring.
Once that was done, we hot-glued one row of plastic eggs on top of our bottom eggs.
Then we tucked Easter basket "grass" into the gaps with an unsharpened pencil, hot-glueing here and there.
Afterwards I took the wreath over to the garbage can and trimmed excess grass stragglers.
And... VOILA! Our masterpiece! Hope you had a great Easter!

Saturday, April 21, 2012

Shoes to Dye For

My favorite pair of shoes aren't looking so good these days. I've had them for years! They started to fade long ago, I've replaced the laces, and the insoles aren't so great anymore, but there's still plenty of tread on the bottoms and I just know these old shoes still have some life in them! I've had them so long I should probably just replace them, but I'm not quite ready to part ways with them. So I decided to give them a MAKEOVER!
Side of shoe prior to treatment.
I saw some fabric spray paint in a craft store a while back that I thought might be perfect for this project! Since the paint was thin enough to spray, I knew it'd be easy to apply with a paint brush.
Here's I shot I took in the midst of painting. The left side of the shoe depicts "before" and the right side depicts "after" treatment.
With a steady hand, I carefully repainted all of the red suede with this fabric paint. And... VOILA! Now they look just like they did when they were new!

Wednesday, January 11, 2012

God Bless GOOGLE

I recently found myself with an unexpected repair to make. One evening while we were enjoying a warm fire, my husband's unexpected strength <sarcasm inserted here> snapped the pull chain that operates the fire screen in our fireplace's door assembly. Ours is the kind that has a chain that is a counterweighted pulley system with the chain's ends coming out of the right side of the assembly frame.
I removed the assembly from the fireplace in order to better see the backside of it to ascertain if it was something I could easily fix. ...Hmm, I think I can do this!
I checked out the local hardware stores looking for a chain that might work. NOTTA. Then I tried going to a fireplace specialty store. After checking with his distributor (and telling me he was my last hope to get some of this chain), he told me he could get me some for $30 including shipping... WHAT??!? Thirty dollars for nine feet of small chain?! Are you kidding me?! There had to be another way. And there was—GOOGLE!

I discovered that the chain I needed is called "miniature sash chain" or "miniature safety chain" and I was able to find an online seller of the stuff—by the foot even—thanks to GOOGLE! And it was only $.69 a foot (shipping would be another two bucks)! YAHOO! Sure beats THIRTY!
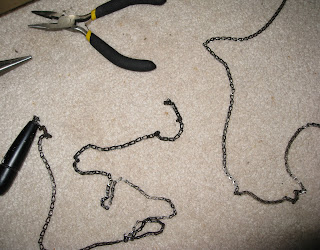
Old chain on left, new chain on right.
Here's a closeup shot of miniature safety chain.
So I threaded the chain through the assembly frame, around the pulley, and back out of the assembly.
The next step was to attach the chain to the rings on the fireplace screen.
And... VOILA! It works! (Was there really any doubt in your mind that it wouldn't?)