Showing posts with label baluster. Show all posts

Wednesday, November 30, 2011

I DID IT!

 I GOT ALL OF MY BALUSTERS INSTALLED TODAY!!! YAHOO! :)

(Special thanks to my sweet brother in-law for loaning me his finish nailer! xoxo!)

IT'S HERE!!

That's right! Baluster installation day has arrived! I had to take a break after installing the first one to make this post—the anxiety over starting the project and the excitement of getting one installed was driving me crazy! Now on to #4...
Baluster #2 is in! Here's #4 lined up and waiting to be marked for cutting!

Tuesday, November 29, 2011

Back to Work!

AT LAST! I finally have time to work on my house again!

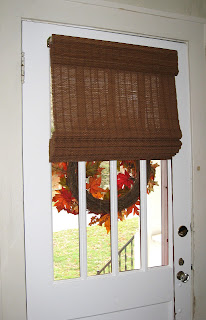
Today I started by putting another coat of paint on my front door. After it dried, I pulled the contact paper off of the glass. When we first moved in here years ago, I put contact paper on the glass to keep people outside from being able to see inside; the contact paper provides a frosted glass type of effect. I am still concerned about privacy and plan on putting up some window tint instead.
In the process of removing contact paper. Note the difference between the panes; the far left one still has contact paper on it, whereas the other three have been stripped. 
Sometimes the afternoon sun really comes beating in the front windows, so we really need a way to block out the light, especially for TV viewing. I have admired my neighbor's bamboo window treatment for quite some time and thought I'd do something similar to my door.
This window treatment was just the right width! The length is a bit much though; 72" instead of the 45" I truly need. I am going to shorten it so it's not so bulky! I think I can do this by trimming this to the desired length and folding the raw edge under with a glue gun; kinda looks like that's what the manufacturer did.
Once I got that done, I turned my attention to the staircase again. I started this project yesterday by removing the remaining balusters. Then I sanded the treads and underside of the railing where the old balusters had been.

I brought the balusters in from the porch. Here they are, lined up like little soldiers. Number five gives me a hard time... doesn't want to stand up very well. Soon he won't have a choice!
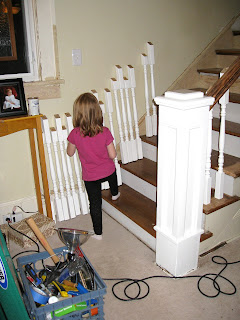
Here's my youngin' (aka "Big Goonie") counting the balusters, making sure everyone is accounted for.
After many weeks of indecisiveness, I finally decided to paint the railing. Here it is in a brown color that is just slightly lighter and more caramel colored than my dresser I painted earlier this summer.
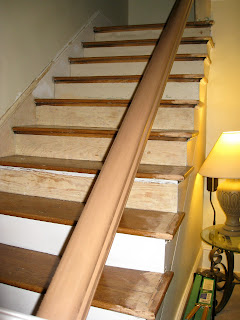
Remember, brown photographs weird...
This morning I applied the same glazing technique to the railing that I did to my dresser project.
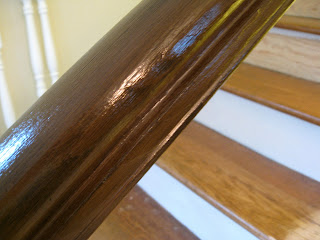
Shot without flash to try to give a better idea of what this actually looks like. Regardless, brown is still difficult to photograph.
Once my railing paint is dry I will need to seal it with a poly-urethane coating so the glazing won't rub off with repeated touching of hands using the railing. After that I think we'll be ready to start fitting and nailing balusters! Check back soon!

Tuesday, September 13, 2011

Hot Mess Tuesday

As always, I have my fingers in a few simultaneous messes today. Let me show you what I'm up to!

First we'll start with the stairs. I've continued to scrape them and get the skirting cleaned up as well. My husband has been pretty good about the destruction and messes I've been making lately. Wonder how he'll handle seeing the stairway with missing spindles? It's a necessary evil—I need to scrape the underside of the railing before I can put my new spindles in.
And speaking of spindles, I have another finish coat of paint to put on them. Here they are with one coat of primer and one coat of finish. Looking good!

I sat on the floor of my screened porch and painted the spindles while my little one sat on the other side of the door jabbering and making this hot mess. And to think she told me she was making SOUP! lol...
Here is a candlestick lamp that I am refinishing today as well. I am stoopid* and didn't make a before picture. It was cream with a crackle finish. The brown will fit my decor much better. Maybe I'll be bright enough to take an after shot when it's done...
*intentional misspelling to further illustrate my point
And lastly, this final hot mess was the inspiration for today's blog title. Let me explain...


You may recall that when I stripped the wallpaper off the other day, I had some wall damage that needed repaired prior to painting. In repairing the wall, the wall's texture was smoothed. I like my house's rough walls! I didn't want to go to the trouble of getting paint and adding sand, so I thought I'd just get a can of wall/ceiling texture and dial down the spray to a fine mist. If needed, I'll sand the texture down a bit prior to painting.
Here's a shot of what I was able to get done before my can of texture malfunctioned after just a couple of squirts:

Definitely one hot mess! At least, I'm assuming this mess is a malfunction? Anyone??
Now where's my receipt?! This thing's going back! Grr...

Tuesday, August 30, 2011

SUCCESS!!

I found turned balusters today! Now the question is, should I stain them or paint them?